MOKE 2XS Electronic Fuel Injection - the Canems Way
The key to modernization, and sure worth the effort. The smooth running and high revving of this 1380 engine attest to this.
Expensive but no other alternative gives the same results.
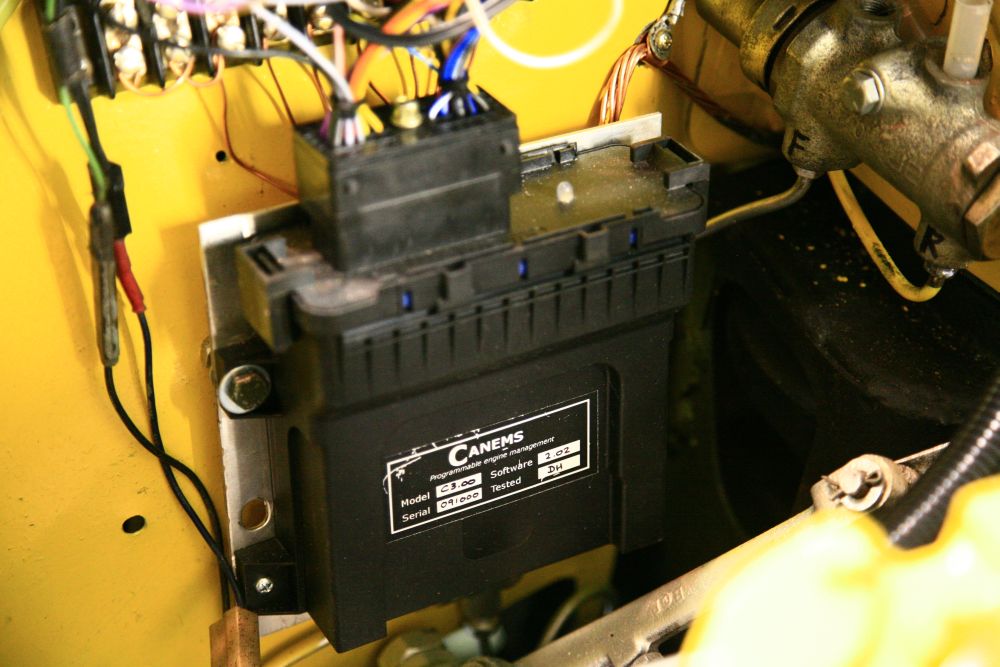
The guts of the system: Canems Electronic Control Unit (ECU)
Why Canems EFI solves the Mini engine problem
The firing order in a mini engine is 1,3,4,2 with cylinders 1,2 and 3,4 sharing the siamesed ports. If fuel is supplied to the manifold at a steady rate (as with a carburettor), cylinders #2 and #3 will draw in fuel supplied over 1+1/2 engine revolutions, while cylinders #1 and #4 draw in fuel from only 1/2 of a revolution. The inner cylinders tend to run rich while the outers tend to run lean and this gets noticeably worse at higher revs. Check the colour of Mini spark plugs and you will see this - the inners will be sooty compared to the outers. After the EFI installation my spark plugs were all perfect.
The Canems (David Hampshire) solution to this problem is to inject the fuel to cylinders #2 and #3 just as those intake valves open, which keeps those cylinders from running rich, and all four cylinders will have the same air/fuel ratio. In addition, exactly the right amount of fuel is injected. The benefits have to be felt to be believed!
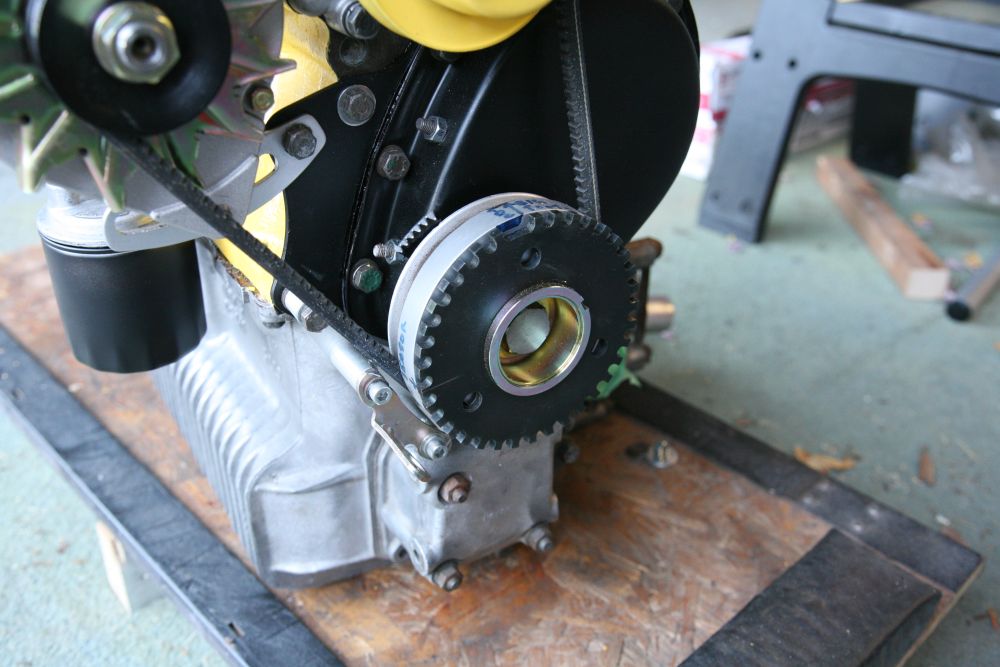
Trigger wheel on crankshaft pulley
The following
explanations are for the technically curious;
you do not need to understand it
all to enjoy driving this Moke.
Overview
The full Canems system includes:
a user mapable ECU allowing for various adjustments of the fuel, timing etc. according to engine speed and load
electronic 'wasted spark' ignition which eliminates the distributor
The system works on all engines, not just Mini. My engine is a 1380 cc A-series and probably produces well over 100 hp. An 850 cc can be made to produce 70 hp.
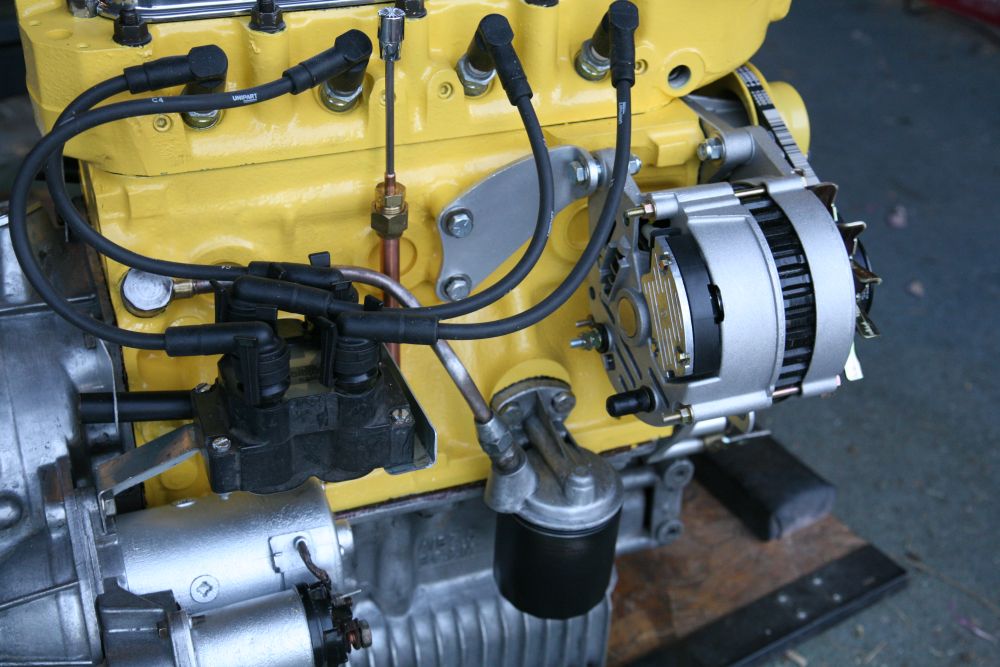
Coil pack (no distributor any more!)
My Parts List (prices may not be current)
Parts supplied by Canems:
- Canems injection ECU, software and manual - £395.00
- Basic wiring loom - £49.95
- Throttle position sensor (Jenvey compatible) c/w connector - £43.70
- Coolant sensor c/w connector - £17.90
- Inertia cut-off switch - £49.95
- Coil pack c/w connector - £55.20
- Custom made HT leads - £29.95
- Crank sensor connector (compatible with KAD sensor) - £2.95
- 2 x Fuel injector connectors - £5.90
- 4 way fuse box & fuses
- 30 Amp + main relay
Parts supplied by Jenvey:
- Jenvey DCOE-style throttle body (part number TBS42i) plus ram pipes ~ approx. £200
- Fuel pressure regulator and housing ~ approx £69.00
- Weber DCOE to A-series SHORT inlet manifold ~ approx £100
Parts supplied by KAD Engineering:
- 36-1 trigger wheel kit (bolts on to existing crankshaft pulley) c/w sensor ~ approx. £120
Other parts obtained:
- High pressure fuel pump, c/w pre filter ~ approx. £85
- I fitted 2 wide-band oxygen (lambda) sensors - Innovate LC-1 with controllers. More expensive but much more accurate
(You could fit one narrow band, heated, lambda sensor c/w stainless boss and bung - £20)- 2X 650 cc/min fuel injectors ~ approx £140 for pair
- Injection quality fuel hosing
- Resistor-type spark plugs must be used (recommend NGK BPR6ES) ~ approx £8
- LCB exhaust manifold (optional but it must be a separate exhaust manifold not connected to the inlet manifold)
- 1.5 ratio roller rockers (optional - need grinding a bit if using an aluminium rocker cover)
- Aluminium rocker cover (optional - needs grinding to allow use of roller rockers)
- Air temperature sensor (optional)
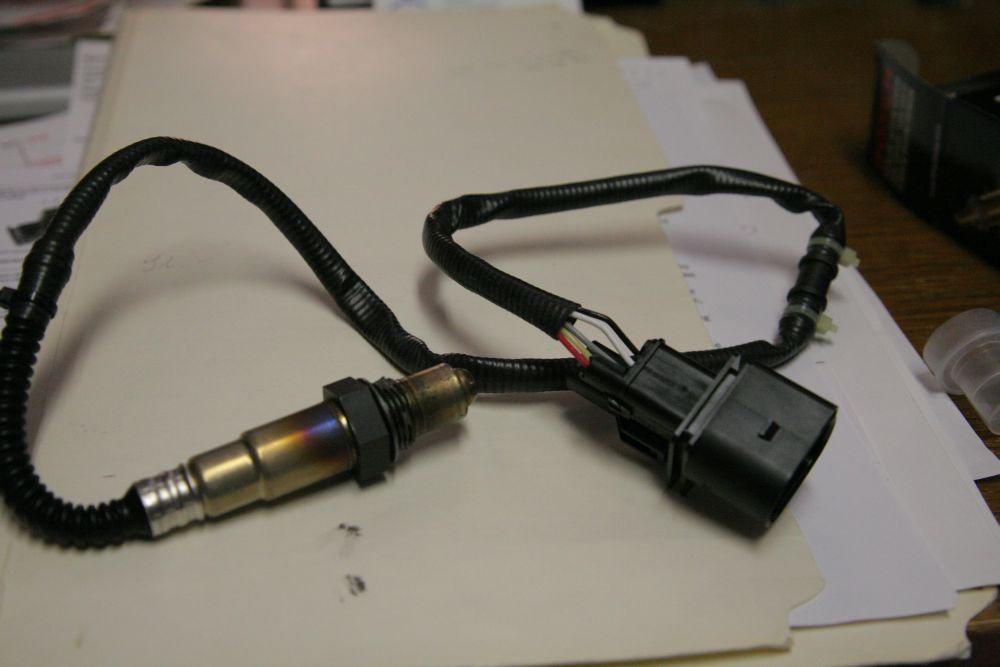
One of the Oxygen Sensors
Installation - Main Points of Setup (My engine was already out, but can be done with engine in situ)
- Inlet and exhaust manifolds with lambda sensors, bosses brazed at a convenient spot low down
- High pressure electric fuel pump and filter
- Throttle bodies and connect fuel rail, injectors, throttle cable, MAP sensor, throttle position sensor
- Fuel pressure regulator and all high pressure hoses (note a return line is necessary - I used one fuel tank breather for point of entry and left the remaining 3 breathers)
- Crank trigger wheel and sensor (no distributor and no points!)
- Coil pack and spark plug wires
- Canems ECU with harness through bulkhead
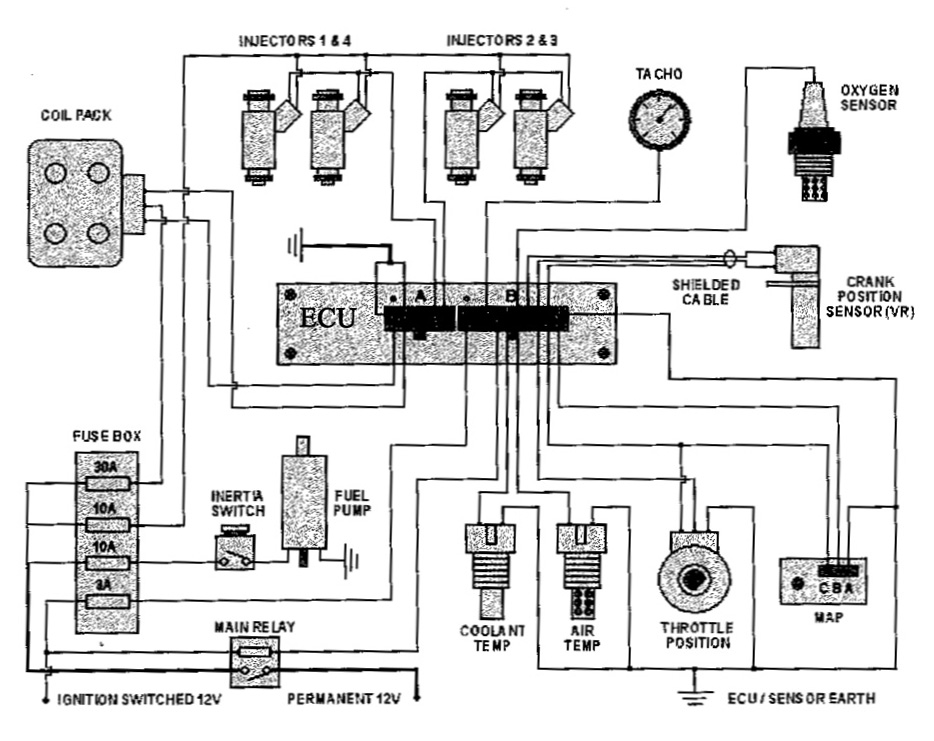
- All wiring (see diagram below)
- Using a laptop computer, install software and transfer sample setting to ECU
- Fire 'er up!
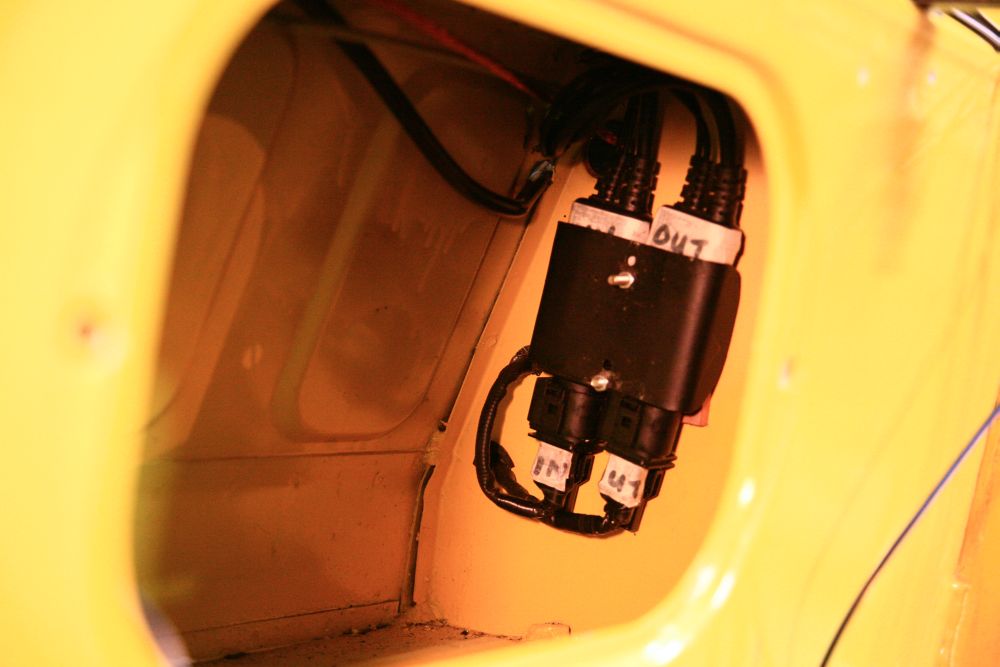
Control units for Oxygen Sensors (mounted in Moke side locker)
Performance
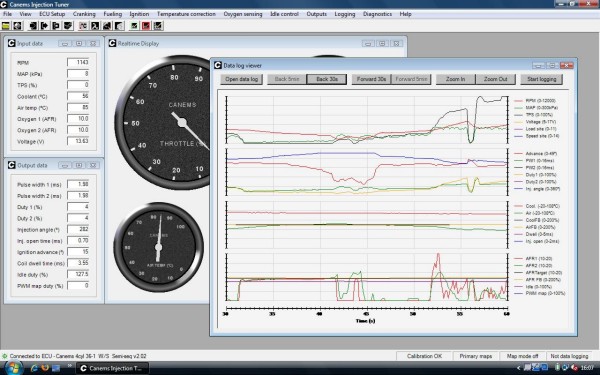
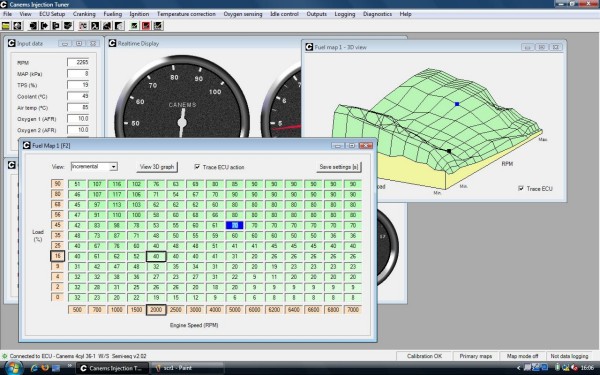
Adjusting mappings, which involves setting dozens of values for each speed and load point takes quite a while. This is the beauty and power of the system - you can do all this from a laptop and ensure the mixture, timing and many other factors are all optimised.
The mapping supplied was quite close so it just needed tweaking here and there. You can be off and running very quickly.
I have not yet perfected my mappings, but they are nearly right and my Moke goes like stink!
David Hampshire was a great resource person and a real gem to answer all my questions, and give advice. I cannot thank him enough.
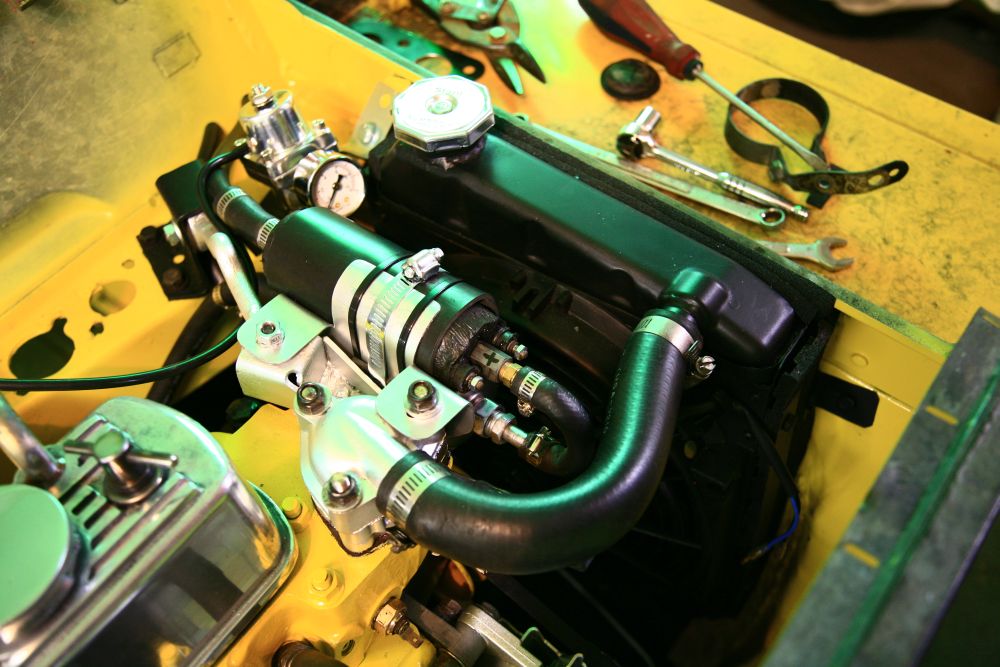
Fuel pump, and pressure regulatorwith gauge.
Other Considerations
- With the Weber inlet manifold and Jenvey throttle bodies plus ram pipes, I had to make a recess in the bulkhead. This is not so bad on a moke but the speedo cable gets cramped (I fitted a right angle drive). Even then filters are a problem. So I would manufacture separate short inlet manifolds and use Kawasaki throttle bodies. This would also be much cheaper.
- I would not bother with an aluminium rocker cover if I fitted roller rockers.
- With all the power my engine produces, I was afraid for the differential so I fitted a heavier duty 4-pin type.
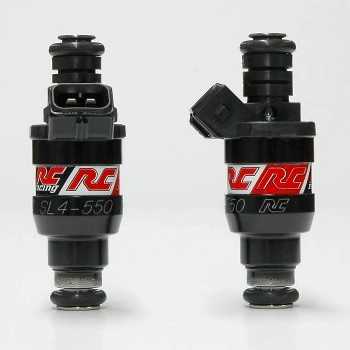
Fuel Injectors
Costs
- This might look expensive, but go figure out what it costs to install twin Weber carbs with manifolds (and still have the rich/lean problem and not get the performance Canems produces!)
- Many parts can be obtained at local wreckers or on Ebay with big savings (e.g. I got a coil pack for $10 rather than GBP 55 - 1/10 the price)
- I consider it well worth the outlay considering how it improves my Moke
Resources
- MiniWorld Summer 2008, P.98 has an excellent detailed write up with photos
- MiniWorld August 2009, P.88 has a couple of dyno results for Canems equipped Minis
- Canems website: http://www.canems.co.uk/ David Hampshire has developed the system, manufactures, markets and installs it. He has been a great help in answering my questions and giving advice.
Wiring diagram:
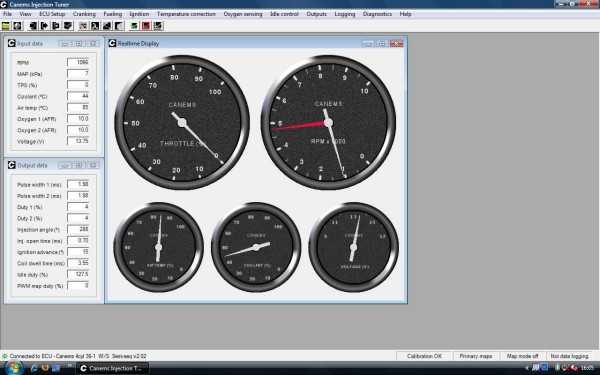
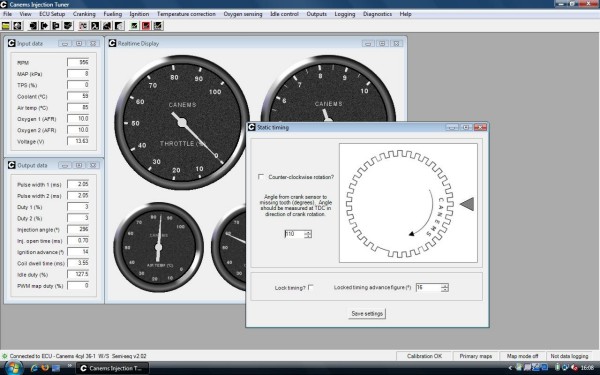
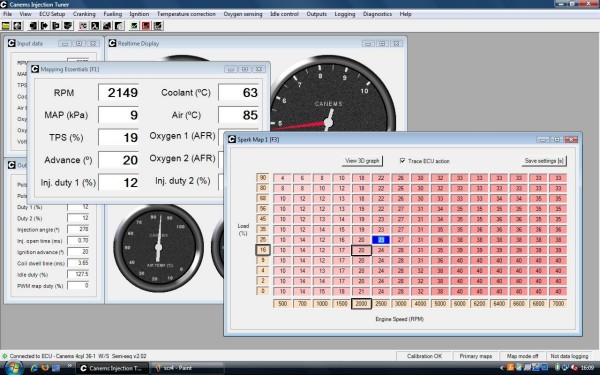
Some Laptop Screen shots of the software in action:
The default interface showing the essentials
Static Spark Timing
Dynamic Spark Timing Map
Fuel (quantity) Map
Data Log Viewer. This is an invaluable tool for getting the final little tweaks right.